# Setting up a Journal
Journaling has many benefits. Although conventional wisdom dictates jotting ideas down on paper is more liberating since you can juxtapose doodles, diagrams, and charts having a digital media allows for sweet searching methods years from now.
# Setting up vimwiki
First let's set up vimwiki, an extension for vim that does a few things:
- provides syntax highlighting for markdown
- makes navigating links between files work with enter key, and other shortcuts (opens new window)
- keeps the journal within easy reach, (
<Leader>wwfrom anywhere)
To set up, add this to ~/.config/nvim/init.vim:
Plug 'vimwiki/vimwiki'

let g:vimwiki_list = [{'path': '~/journal/', 'index': 'README',
                     \ 'syntax': 'markdown', 'ext': '.md'}]
# Setting up vuepress
~ $ yarn create vuepress journal
Then it'll ask you a bunch of questions. The first one is important: Select the boilerplate type. Choose doc, since the blog version is not as nice. After you answer the rest of the questions it'll generate boilerplate code as well as some example files.
Let's do some cleanup. We'll want to keep the .vuepress boilerplate code, but
delete the example files. Since vuepress was actually designed for documentation
it keeps to the docs/ folder by default, so that you can use the rest of the repo
for product development. Let's promote the content of docs/.vuepress/ up one level
and delete the example files that remain behind in docs/
~ $ cd journal
~/journal $ mv docs/.vuepress/ ./
~/journal $ rm -rf docs/
Now modify the package.json to no longer point its scripts to a docs file, like so:
  "scripts": {
    "dev": "vuepress dev",
    "build": "vuepress build"
  },
The configuration file .vuepress/config.js is where site-wide modifications
such navigation menu are done, as per the
vuepress documentation (opens new window). That can be done
later, but for now the first line must be updated as shown below:
const { description } = require('../package')
Now the site should "compile" with the command yarn build. However, I prefer
to use the development server (yarn dev) since it auto-reloads anytime the files change.
Running yarn dev will end with an address like http://localhost:8080/ type
it your browser and enjoy your new page. Simultaneously edit ~/journal/README.md,
save, and confirm that it auto-reloads the updates.
# Version Control
Now is a good time to get things version controlled with the ultimate goal of
getting it on Github. git init, git add ., git commit should take care of
everything. Create a new repo on github.com with the privacy setting set to private.
Even though the intent is to publish the master branch of the journal publicly,
we don't want articles that are still being drafted on other branches showing up
as well.
# Free Publisher/Host
If you don't already have one, create an account with netlify (opens new window).
Log in and click on New site from Git. It's a 3-step process, the first is
to connect Github. Then select the repo. Finally set the specific settings:
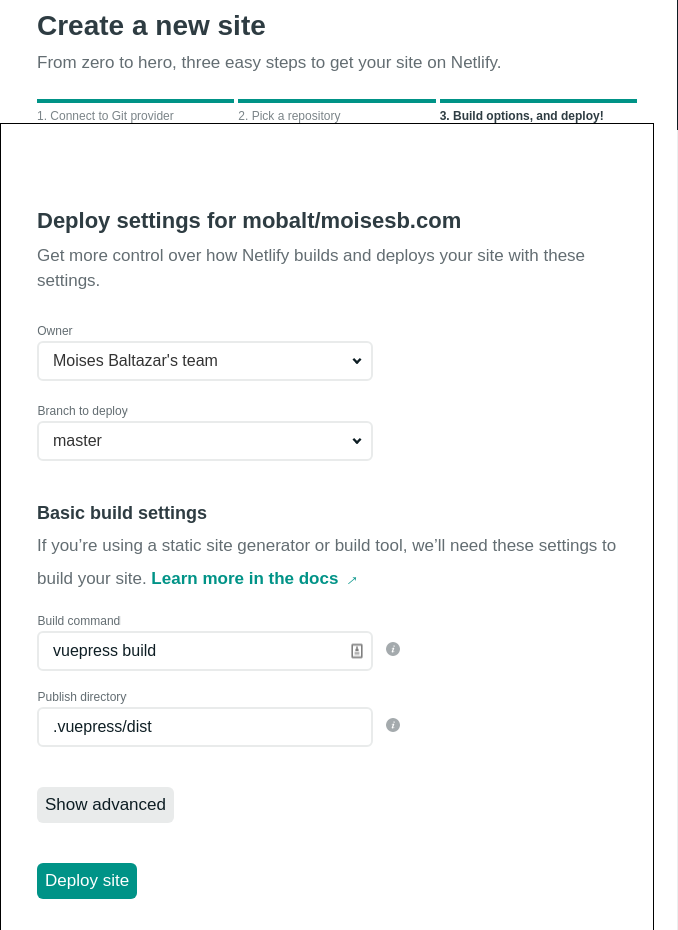
You can go further and buy a custom domain and set up SSL. Up to you.
# Workflow
It is best to keep the checked out branch to drafts and only move things to the
master branch once you are ready to publish. Don't forget to do git rebase
so that only specific changes are transferred over to master. Finally before
doing git push -u origin master make sure you double-check what it is going
to look like since netlify will promptly get those changes, compile them, and
publish them. Happy writing!